
Stealth Car Alarm Install
1995-1998 Nissan 240SX
This is a Viper 5000 into a 1996 Nissan 240SX. Using this information to do a stealth install with a different alarm into a different car requires no great stretch of the imagination. This how-to does not cover remote start, window modules, or factory alarm bypass. At any point in this how-to, you can stop what you're doing and drive off with the car, until you've cut the starter or fuel pump power wire for the alarm's start-kill.
The 95-98 Nissan 240SX is a great car. Rear wheel drive, excellent suspension balance, the potential for a SR20DET swap; if you're reading this, you probably already know what I'm talking about. The other great thing about this car is how well it responds to the custom security install that I advocate. This car desperately needs security because it's a target for joy rides. It also has glaring weaknesses similar to other mid nineties Japanese cars.
To do a full stealth car security install on this car, you're going to need the following:
Tools
- Crimpers
- Wire Strippers
- Scissors
- Needle nose pliers
- Razor Blade
- Drill
- 17/64 Drill Bit
- 15/16 Wood Spade Bit
- Drill bit socket adapter
- Ratchet
- Long extension
- Sockets 10, 12, 14mm
- Heat gun
- Medium Screwdrivers
- Short philips screwdriver
- Tiny normal screwdriver
- Flashlight
- Droplight
- Soldering iron
Supplies
- Non-insulated butt connectors, 16, 22 ga
- Heat shrink tubing, 1/4 , 3/16 dia
- Ring terminals, 16 gauge, 1/2 dia
- 16 gauge wire, black preferred
- Electric tape
- Split loom, large, medium, small dia
- Zip ties, small, large
- Solder
- A box to throw shit into.
- Trash Can
- 8-10 hours worth of music
Stealth Constant and Ignition 12v Connections
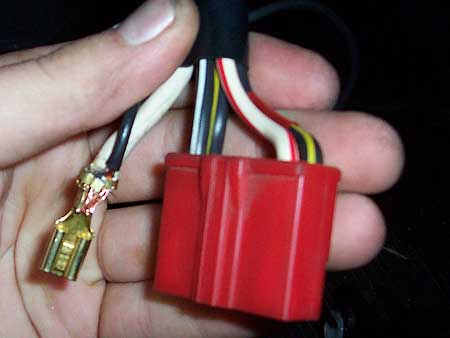
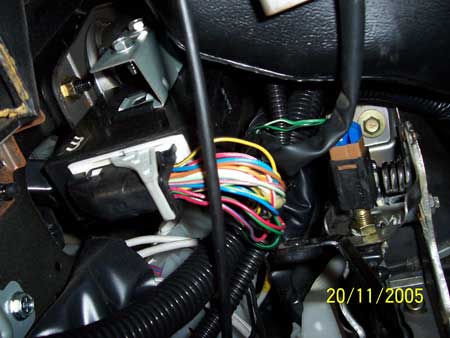
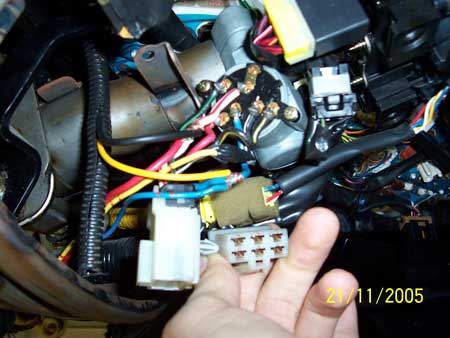
The pic with a red harness connector is from a different car, but you get the idea.
The best way to tap into a constant 12v and ignition 12v in this instance is to pull apart the harness connector at the steering wheel, de-pin the appropriate wires, pry open the clip on each respective spade connector, clamp the alarm wire in, solder it, re-pin the spade connector, and reconnect the harness plug. Then loom each side of the harness.
Fuse Block Outputs
Unfortunately there are no extra fuse block outputs on this car.
Removing Existing Aftermarket Alarm
This is pathetically easy. Your existing alarm is probably connected with scotch locks. Write down the wire colors and pull out the male quick disconnects. If it's hard-wired, cut the alarm wire and wrap it with electric tape. Cut the zip ties and pull the alarm out. Leave the siren and valet button in. You can reuse your old LED on a new alarm. If it doesn't work, try reversing the wires. You could reuse the start-kill relay, but you will want to add a second start-kill to another car circuit such as your fuel pump. Otherwise put it back to stock. Just behind the steering wheel, cut the start-kill relay off and look where your starter wire was interrupted. Crimp it back together with a 12 gauge non insulated butt connector and heat shrink it.
Plan The Alarm Wiring
OEM Wire Colors
| 1995-98 NISSAN 240SX | ||
|---|---|---|
| WIRE | COLOR | LOCATION |
| 12 VOLT CONSTANT | WHITE/RED | BEHIND STEERING WHEEL |
| STARTER | BLACK/YELLOW | BEHIND STEERING WHEEL |
| IGNITION | BLUE | BEHIND STEERING WHEEL |
| PARKING LIGHTS (+) | RED/BLUE | ANTI-THEFT MODULE |
| DOOR TRIGGER | RED/WHITE (-) | ANTI-THEFT MODULE |
| DOMELIGHT | USE DOOR TRIGGER | |
| FUEL PUMP | BLACK/YELLOW | BLUE RELAY DRIVERS KICK FROM DRIVERS DOOR SILL TO REAR SEAT |
| POWER LOCK | LT GREEN/WHITE (-) | ANTI-THEFT MODULE |
| POWER UNLOCK | LT BROWN (-) | BEHIND HOOD RELEASE HANDLE |
| TRUNK TRIGGER | RED (-) | ANTI-THEFT MODULE |
| HOOD TRIGGER | YELLOW/BLACK (-) | ANTI-THEFT MODULE |
- (Hidden) Siren power - Red - to alarm Brown (shared with other sirens)
- (Hidden) Siren ground - Black - to chassis ground (shared ring terminal)
- Alarm ground - Black - to chassis ground (shared ring terminal)
- Domelight ground - Black/White - to chassis ground (shared ring terminal)
- Door Lock grounds - Violet/Black and Violet - to chassis ground (shared ring terminal)
- Battery backup ground - Black - to chassis ground (shared ring terminal)
- Battery backup - Red - to car constant 12V (not the alarm's constant 12v)
- Battery backup - Gray - to alarm Red (shared with alarm's constant 12V connection to car)
- Battery backup - Blue - to alarm Gray (shared with hood pin switch input)
- (In engine bay) Siren power - Red - to alarm Brown (shared with other sirens)
- (In engine bay) Siren ground - Black - to chassis ground
The most important stage affecting the end result is the planning stage. An organized plan results in a clean, stealthy install. Start with the easy stuff first. Be methodical. First thing you do is print out your vehicle's wire color chart from my site, Bulldog Security wire color charts, and/or The 12Volt wire color charts. Now take your alarm installation manual and compare it; writing down what color/harness alarm wire goes to which wire on your car. On the chart in the installation manual, mark the alarm wires that you will not be using with an X to be de-pinned later. Beneath the chart, write down the other required connections, like the siren wires and battery backup module wires. Group all the grounds together that can share a single ring terminal, ie interior siren ground, door lock harness grounds, domelight input ground, main alarm ground, start-kill relay ground. If you are adding any actuators (door lock, trunk pop), make a note. If you are doing any external start-kill relays, draw a simple diagram.
De-pin Unused Wires
De-pinning unused wires on the alarm harness keeps it clean, simplifies installation, and reduces the risk of a stray wire grounding out. A very small regular tipped screwdriver works well. De-pin wires from the harness by pressing down on the tab with the screwdriver while pulling on the wire. The wire colors will vary if you're not installing a Viper 5000, but you can find your wires using the descriptions.
De-pin the following wires:
Primary H1 harness
- Red/white (-) 200 mA Channel Output - used for trunk poppers etc
- Violet (+) Door Trigger Input - doesn't apply to Nissan
- White/Blue (-) 200 mA Channel Programmable Output - another extra output we don't need
Auxiliary Harness
The only wire we"re using is the (-) Hood Pin Input. De-pin the rest of the channel outputs, retained accessory output, and factory disarm output
Immobilizer Harness
*This applies to the Viper 5000 only.
Green/Black Starter - Normally Closed (motor side) - We"re doing a normally open setup.
The green/black wire is not used and should be de-pinned from the harness, but don't bother trying to pull it out of the alarm.
Door Lock Harness
- White/black Lock #87a Normally closed - not used
- Brown/black Unlock #87a Normally closed - not used
Ground these three wires to the chassis
- Black/white Dome Light Supervision relay Input #87
- Violet/black Lock #87 Normally Open (Input)
- Violet Unlock #87 Normally Open (Input)
- Diagram for Wiring Nissan 240SX Factory Door Locks to Viper Alarm
Getting Started
Now the best things to get started on are the alarm's peripheral devices that aren't going to be mounted near the alarm brain. I'm talking about the hood pin switch, sirens, sensors, LED and valet button. You should also include other parts of the stealth install, like hood cable relocation and a kill switch. These can be mounted and the wires run days in advance of installing the alarm if you want to.
Hood Pin Switch
This car comes with a factory hood pin switch. Imagine that. You can tap into it at the factory anti-theft module along with all the other wires we need to tap into.
Re-route Hood Cable
Reroute your hood release cable. Remove the two 10mm bolts on the hood release handle. Detach the cable from the handle. Set the driver's side front on a jack stand and remove the wheel. Remove the screws securing the plastic fender lining. Pull the cable from the tabs and from the hole in the firewall, and free it all the way to the latch and set it aside. Do not close your hood until the hood release system is reassembled. Route the hood cable through the engine bay alongside the driver's inside fender. Secure it to wire looms etc with zip ties until you reach the brake master cylinder.
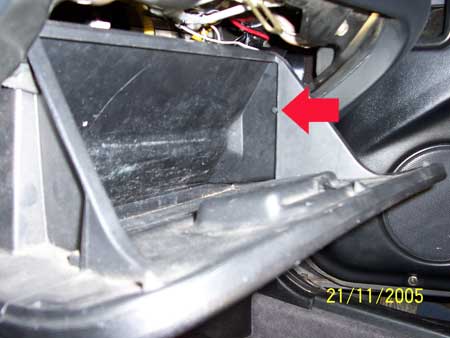
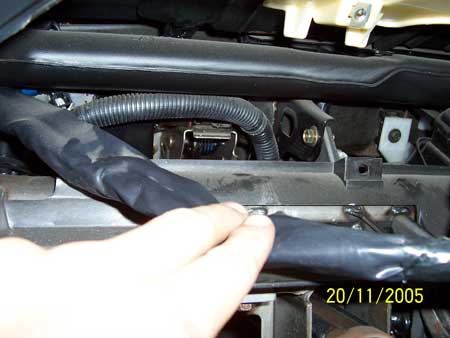
Through The Firewall
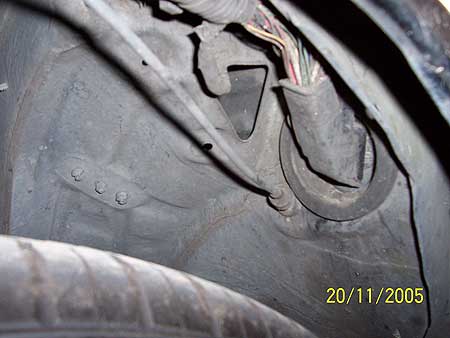
The blue arrow points to the hood release cable that needs to be rerouted through the engine bay. The red wire is where you can run your engine bay siren wire, however, I suggest you drill a hole through the firewall for both the hood cable and the siren wire.
This is one of those cars where it is difficult to route anything through the firewall. The driver's side of the firewall near the brake booster is cluttered with all kinds of shit. The grommets in the firewall are hard rubber with little available clearance. On the interior side, there's a thick firewall mat and it's difficult to get everything apart so you can lift it up. There is no easy answer here so I'll just leave it up to you.
The manufacturer put a very large grommet through the firewall inside the fender. The hood release cable has a seperate grommet right beside it. This is the easiest place to route your wires, however, it's too easily accessible from the outside. Even though we are installing an interior siren that can't be cut, since we are rerouting the hood release cable, you might as well run the siren wire alongside the cable wherever it ends up passing through the firewall.
Engine Bay Siren
If you are installing two sirens, one can be used for external sound dispersion, and the other can be hidden. Find a place in your engine bay to mount your outside siren. If you've rerouted your hood cable, why not put the siren inside the fender? The siren should face down, and you can try to use a factory bolt for one of the mounting bolts and for a ring terminal to ground the siren. For the other side of the mount, drill a pilot hole and use a screw. Set the power wire aside for now.
When two sirens are branched off the same alarm output (brown wire), it's possible for a thief to short this wire and silence the interior siren. To prevent this, isolate the engine bay siren from the interior siren with a 1 amp fuse. Splice an inline fuse holder on the brown wire after the interior siren and before the engine bay siren.
Behind the glovebox is a great place to mount your hidden siren. Remove the screws holding the glovebox. Zip tie the siren wires to the dash support bar (leave it loose for now in case you also end up running a valet button or antenna wire slack this way), run it behind the climate control (where we'll be installing the alarm brain later) using a metal coat hanger to reach through, and then run it up behind the cluster to the alarm. There is a couple of bolts there to use as a grounding point.
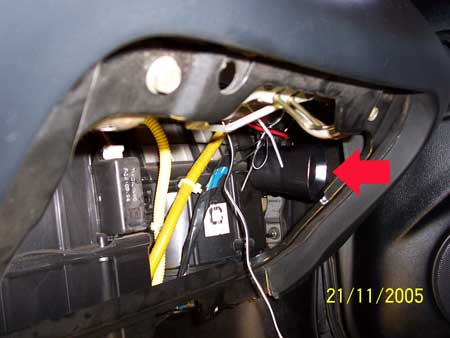
Mounting LED/Valet
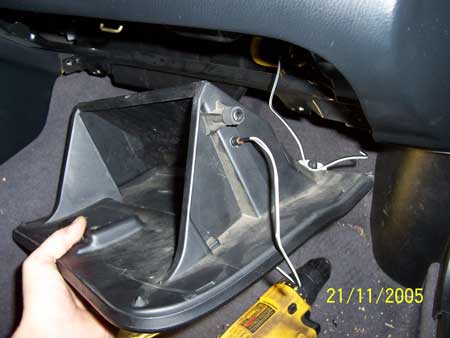
The center console is a good place for your valet button and LED. I put the valet behind the crease in the glovebox for this particular example. It's not necessary to hide the valet button since you can't do anything with it without the ignition key. Just be sure that its wires don't give away the alarm. Be sure to program a valet code later. The manual says to use a 9/32 drill bit, but that makes the LED and switch a little loose, so I use a 17/64. You can splice in quick disconnects for easy removal. The driver's side corner dash vent is another great place to mount the LED. You can put the LED in the vent cover without penetrating the air system. I thought I took a pic, but I didn't so what the fuck. Close your eyes and squeeze until you can see it in your head.
Mounting Sensors
The center console is the best place to mount a motion/proximity/radar sensor. Inside the console there is often some plastic ribbing. Drill some very small holes and zip tie the sensor, then run the sensor's wiring underneath the rear carpet and leave it under the rear seat for now.
The best place for a tilt sensor is screwed to the floor on either of the car's four corners.
I typically mount the shock sensor near the alarm, either to the alarm wire harness or on the frame of the car, depending on what the alarm manufacturer recommends. The shock sensor is internal to the Viper 5000 and its sensitivity is adjustable by remote. You can't beat that with a telephone.
The best place for a glass breakage sensor is anywhere that the mic is exposed to the open air of the cabin.
Antenna
Install the antenna exactly as shown in the installation manual for maximum range. Run it from the brain behind the cluster, through the side of the dash and under the door sill lining near the side mirror; up along the edge of the windshield and tucked behind the headliner, with the actual antenna box wedged behind the rear view mirror pointing downward. don't bundle up the slack, but stretch it out in a big loop from the alarm brain behind the climate controls to the passenger side of the dash. Zip tie one side of the loop to the dash support bar with the siren and valet wire, and let the other side of the loop hang down.
Getting Serious
A work in progress.
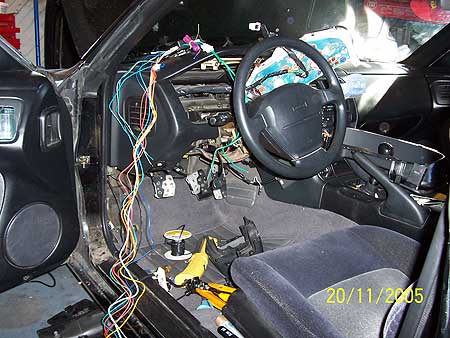
Remove Cluster
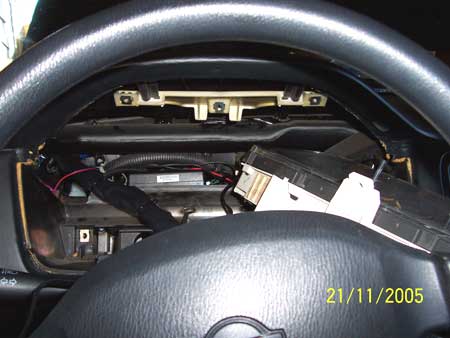
When you're ready to get crazy and actually install the alarm, you have to remove the cluster trim. First remove the lower dash trim, the dead pedal, the driver's kick trim, and the hood release handle. Next remove the plastic cover behind the steering wheel. Then take out the two screws in the cluster trim with a stubby screwdriver. The cluster itself is held in by three screws. Admire the huge real estate behind the cluster! don't secure the alarm brain or any wiring just yet. Just put it in place so you can estimate the wire length and start making wire connections. Be sure to leave enough slack in the wire tucked behind the cluster so you can access the brain later without unplugging it. Wrap the alarm wires in split loom and tape the first 2 feet of it before dropping it through the dash. Plug all the wire harnesses into the alarm and rest the alarm near its mounting location. don't forget your LED, valet button, and sensor wires you ran earlier. The hood pin input on the auxiliary harness is very small and easy to forget, so get some 18 gauge wire, estimate the length to the anti-theft module, and crimp it leaving the other end to be connected later.
Chassis Grounds
Group all of your ground wires noted earlier and crimp them into a single 10 gauge, 1/2 inch diameter ring terminal. Behind the cluster is a large bolt with barely enough threads to get a nut on. You can change it out for a longer bolt if it's too hard for you. That's why it's always good to collect random bolts in your tool box when you're at the junkyard.
Alarm Connections

The great thing about this car is that you can make most of your alarm connections at the factory anti-theft module. All you'll have is one inconspicuous and untraceable loom dropping down. Keep your constant 12V and alarm ground connections seperate. That way if for some reason they cut this loom, your alarm will lose some functionality, but the start-kill and siren functions will not be compromised. If they cut your constant 12V connection, you still have the battery backup. And besides, you're setting up your start-kill as normally open. We have car thieves beat on so many levels that it's not even funny. LAYERS, BITCH!
don't forget that some alarm connections are going to be shared. The trunk trigger might be shared with a tilt sensor and/or battery backup module instant trigger, and the siren output is going to have to be split between both sirens at some point.
Door Trigger/Dome Light
On this car, you use the door trigger for your dome light connection. Splice your alarm's dome (black/white on main harness) and door trigger wire (green) together, then connect it at the factory anti-theft module. Ground the black/white dome light selection input wire on the alarm's door lock harness.
When you're cutting into any wire on your car that holds a constant 12V, or if the wire holds 12V while you're working on it (such as the door trigger when the door is open), first pull the fuse, or at least be careful not to touch it to ground.
Group the wires that will need to go to the dash and bundle them with a strip of electric tape.
Constant And Ignition 12V
If you're using a battery backup module, then go ahead and grab a constant and ignition 12V at the soldered connections behind the steering wheel. Tap into them using the method described in the section 'sTEALTH CONSTANT AND IGNITION 12V CONNECTIONS". If you're not using a backup battery module, why the fuck are you even wasting your time?
Battery Backup
For the battery backup, I use a big block of shipping styrofoam like what you get when you buy a stereo. I cut a section out so that the battery fits in tightly, and then I wedge the whole block into a gap. The module itself can be hung by a wire harness using a zip tie.
start-kill
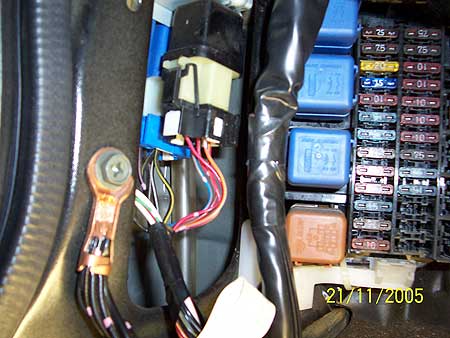
For a stealth install, the absolute best choice is to interrupt the black/yellow fuel pump wire. This wire runs from the fuel pump, down the driver's door sill, to the blue fuel pump relay in the driver's kick. On the other hand, you might want to put a seperate kill switch on this wire, and connect your starter kill to the wires just behind the steering wheel (starter wire is also black/yellow). Leave your start-kill for last, because as soon as you make the cut, your car is disabled until your alarm is functional. On the Viper 5000, you simply connect the green/white wire from the immobilizer harness to one side of the side of fuel pump wire, and the green wire to other side of fuel pump wire.
Programming Normally Open start-kill
This applies to the Viper 5000. Since we"ve set up the start-kill to be normally open, the alarm has to be programmed as such. This is menu 2, item 11. Open the door, turn the key on, then off. Hold the valet button until it chirps twice. Tap the valet button 11 times, then tap and hold it. Hit the unlock button on the remote. Let go of the valet button and close the door. Make sure the car starts with the alarm disarmed. If you did a fuel pump kill, make sure the engine runs for more than 10 seconds.
Setting up your start-kill circuits as normally open means that they have to be bypassed individually even if power is removed from the alarm or the alarm is somehow shorted out. Most good alarms have some provision for a normally open setup, whether it is a programmable status output, or a ground-when-disarmed output (like the Autopage RS-855).
Testing The Alarm
Troubleshooting is easy with an LCD remote. Open the passenger side door, pop the hood, and pop the trunk. Arm the alarm. It should indicate all three. Disarm the alarm and close everything up, but leave the driver's door open and arm the alarm. It should indicate the door. Test the sensors. Try starting the car with the alarm armed. On a starter kill, it shouldn't even crank. On a fuel pump kill, it will start and immediately die, or just crank. don't crank the engine too long or you'll burn up the starter. Verify that the alarm controls the dome light, LED, and parking lights. Listen for both sirens. Prop open the hood, arm the alarm, and disconnect the battery. It should trigger and continue sounding without the car battery connected.
Review the programming options. You can vastly improve the security of your car simply by enabling some features on your alarm that are disabled by default. Consider enabling passive arming and car jack prevention. Though some features may cause you some inconvenience, none of them are more inconvenient than having your car stolen.
Loom and tape up all the remaining wiring. Secure the alarm brain. Reassemble your vehicle, briefly test the functioning of the alarm once more, and then enjoy some peace of mind.