
- This Page
- Home
- The Basics
- Stealth Installs
- Misc Security
- Kill Switches
- Convenience
- Modifications
- Maintenance
Simple Fuel Kill Switch
DO NOT USE THE EXACT MOUNTING LOCATIONS SHOWN IN THESE EXAMPLES. THESE ARE NOW WELL KNOWN TO THIEVES AND IT IS A MISTAKE TO RELY SOLELY ON A FUEL KILL SWITCH OR ANY OTHER SINGLE SECURITY METHOD.
And that's your fault for not using your imagination! Do you think that I rely on these kill switches after creating this website?!
Here is an example of a fuel kill switch Version 1. These pictures are of a 90-93 Acura Integra 2 door. This setup is virtually identical to the 88-91 Honda Civic 2 door, and extremely similar to all Hondas and Acuras with electronic fuel pumps throughout the years.
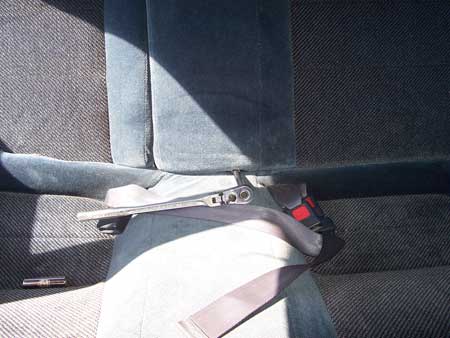
All Honda/Acura seats have one or two 10 mm bolts through a wire loop holding the rear lower seat cushion down. Remove that with a deep socket or extension, then pry from the back corners first and unhook the front.
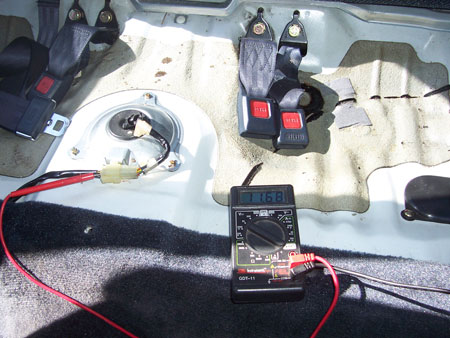
At the fuel pump is a plug with several wires. Most Hondas/Acuras use yellow and a stripe for the fuel pump wire. Set your digital volt meter to 20V DC, put the red probe to the suspected wire, then ground the black probe to the chassis. I used the door hinge in this example. Put the key on without starting the engine. The voltage should jump to 12 corresponding with the whirring of the fuel pump, then drop to 0. Start the engine, the voltage should jump to 12 volts. Shut down the engine. The volts should drop to 0.
| Fuel Pump Power Wire | ||
|---|---|---|
| Year/Model | Wire Color | Location |
| 90-93 INTEGRA | YELLOW/BLACK | DRIVER'S RUNNING BOARD -> REAR SEAT |
| 94-01 INTEGRA | THICK YELLOW/GREEN WIRE, DRIVER'S RUNNING BOARD -> REAR SEAT | |
| 88-91 CIVIC | YELLOW/BLACK | DRIVER'S RUNNING BOARD -> REAR SEAT |
| 92-95 CIVIC | YELLOW | DRIVER'S RUNNING BOARD -> REAR SEAT |
| 96-00 CIVIC | YELLOW/GREEN | DRIVER'S RUNNING BOARD -> REAR SEAT |
| 01-05 CIVIC | YELLOW/GREEN | CENTER CONSOLE |
| 94-97 Accord | BLACK/YELLOW | PASSENGER'S RUNNING BOARD -> REAR SEAT |
You MUST verify all wires with a multimeter.

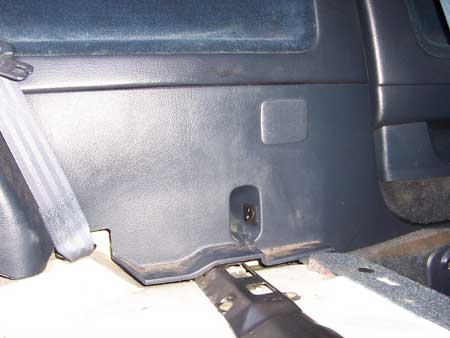
Remove the mounting screws in the rear quarter plastic. We"re not going to remove it entirely, just pry it out enough to work behind it. Ideally you have a panel popper or wide plastic popping tool to pry the rear quarter plastic away from the door sill. You might have to remove the running board on some cars. Locate and cut the fuel pump wire in the corner loom.
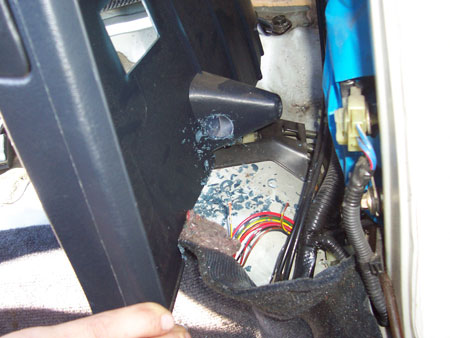
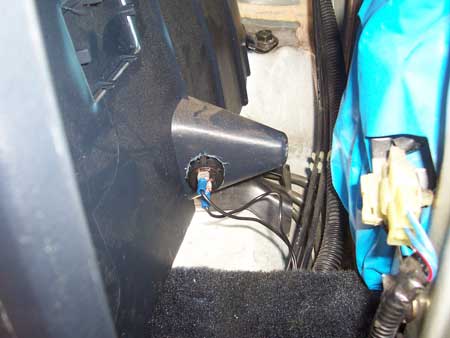
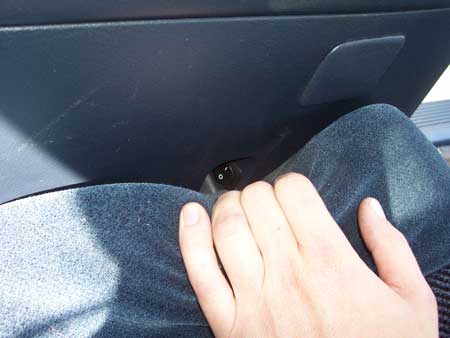
Many Hondas/Acuras have this indentation in the plastic for a screw to hold down the rear quarter plastic. It's hidden by the rear seat cushion and makes an ideal location for the Radio Shack SPST 25A auto switch. Use a 15/16 wood spade bit or a hole saw.
Extend each end of the fuel pump wire by soldering some 18 gauge wire. Terminate each end with speaker connectors and slip them onto the switch. It doesn't matter which end goes to which terminal on the switch. But orient the switch so up is on, down is off. That's the most intuitive because it mimics your home light switches.
This is what it looks like with the panel put back together (contradicting the up/down orientation I just told you).
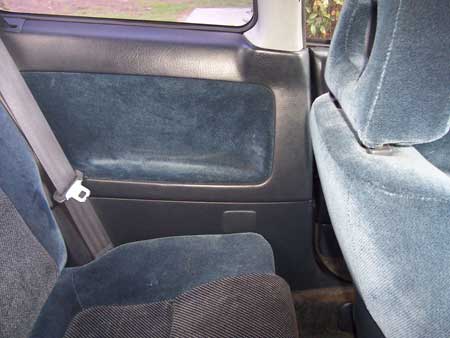
This is what the completed install looks like. STOCK!
The switch is a real pain in the ass to get to on the 90-93 Integra. It works out a little better on the 88-91 Civic, and other cars vary. We"re sacrificing convenience for stealth here, which is often an inverse relationship. You're welcome, even encouraged, to put the switch wherever you want. But if you extend the fuel pump wire more than 5 feet, you need to do Version 2 (relay).
Bottom line is this: what's more inconvenient? Reaching for that switch every time you park your car, or getting your car stolen?
Connecting to Alarm
Supplies
- 20/30A SPDT Auto Relay (Bosch recommended)
- 18 gauge wire
- 18 gauge female spade connectors
If you have an alarm, you can connect your kill switch to the alarm to be controlled remotely, eliminating the physical switch.
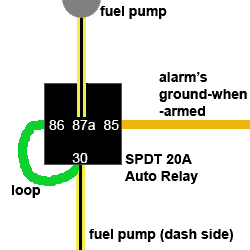
Connect wires to the relay by crimping them into the female spade connectors and slipping the connectors over the relay pins. On all DEI alarms and most others, the ground-when-armed negative output wire is orange. This is the wire that controls the alarm's starter kill relay. It is safe to branch off this wire if it is already being used. Connect it to 85. Cut your fuel pump power wire (shown as yellow/black in the diagram, but will vary). Connect the dash side of the wire to 30, and branch 30 off to 86 (shown in green). Connect the fuel pump side to 87a on the relay. 87 is not used.
Alternatives to Fuel Pump wire
Clutch Interlock Switch
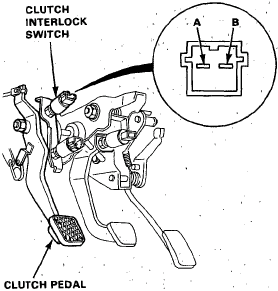
On manual transmission vehicles, you have the option of putting your kill switch on the clutch wire (black/blue on the 90-93 Integra, blue/black on the 94-01 and 92-95 Civic). You don't have to go right to the switch. It's difficult to access. You can find this wire in its own split loom by tracing it back from the switch. You want the top switch (interlock switch), not the bottom switch (cruise control).
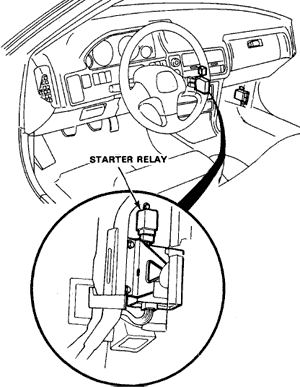
Neutral Safety Switch
On automatic vehicles, you have the option of putting your kill switch on the neutral safety wire (green on the starter relay in this example). Everything is done exactly the same as on the fuel pump wire.
Wire the relay as follows: 85 to a switched ground ie the alarm's ground-when-armed wire. 86 to a true Ignition 12v. 87a and 30 connect to each end of the cut wire respectively.
OBD1 ECU Kills
This information applies to the OBD1 Civic, Prelude, and Integra. 92-95 Hondas and Acuras are OBD1, even though in some instances that overlaps two generations as it does with the Integra.
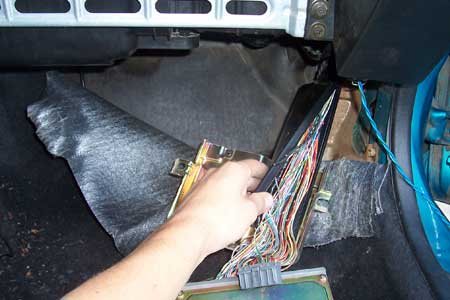
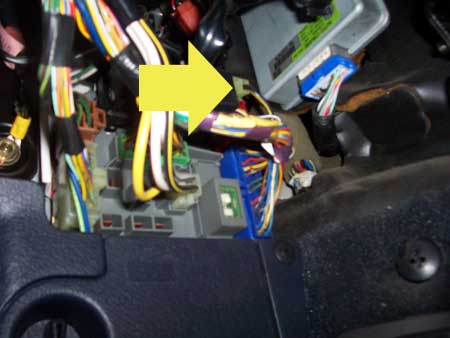
Pull the carpet back from the firewall on the passenger side and remove the four 10mm bolts holding the ECU in place. Flip it around from behind the wire harness and pull it out for better access. Open up the wire case by prying on it with a screwdriver. Do your cutting and splicing inside the wire case. There are three plugs on the ECU. A, B, and D. A is the longest of the three.
OBD1 Fuel Pump Relay
Refer to this page from FFS TechNet for the pinout locations: FF Squad OBD1 Pinouts A7 is controls the fuel pump relay. It's green/yellow on Civics and green/blue on Integras. You can cut that and splice in a switch or a relay connected to the alarm. A8 is usually an empty pin, but if there is a wire there (also green/yellow), cut it and cap the ends.
OBD1 Ignition Control Module
A21 is a red/green wire controlling the ignition control module. Cut it and the car is not going to start.
Advanced Kill Switch (relay)
There are times when you will want to use a relay for your kill switch. If you want to extend the switch wires more than a total of 5 feet from the cut point, if you want to use a smaller switch, or if you want to cut a high current circuit such as the starter or ignition, you will need to use a relay. It's wired the same as my "Connecting to Alarm" diagram. You can connect it to the alarm or trigger it manually with a switch.
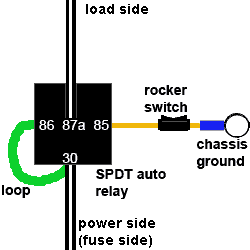
You can substitute whatever circuit you want in place of the black/white Starter wire in this diagram. For instance, the ignition, fuel pump power, neutral safety switch, or clutch wire can all be interrupted instead. Just make sure that the loop is on the power side of the wire you cut. You can use 18 gauge wire to wire the relay.
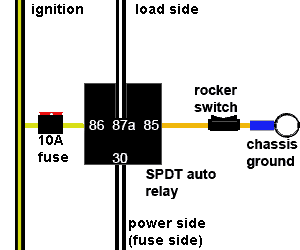
This diagram is the more textbook approach, but it is less stealthy. Instead of looping 86 to 30, you run 86 to the black/yellow ignition wire with an inline fuse of 7.5A or 10A. 86 and 85 should be jumpered with a 1A diode with the striped end connected to 86 (the power side (opposite of how you normally connect a diode)). This prevents a backwards spike when the magnetic field in the relay collapses, thus lengthening the life of the relay.
Here is a pic of the ignition wire on a 90-93 Integra. On all Hondas/Acuras, this is a black/yellow 10 gauge wire. I recommend finding it at the fuse box as opposed to the ignition harness.