- Wed Jan 16, 2008 2:13 am
#37785
DIY! Transmission Rebuilding and You, By Chrono404
Everything in this DIY Article is Based on the 92-95 Honda D-Block 5 Speed Ex/Si Transmission. Others are Similar
NOTE: This DIY Article is just Working on the transmission. Not taking it out of your Car. There are DIY Articles in the DIY Thread for this. Also I am not responsible for any damages done to your Transmission following this article. Processed on your own discretion. "Cartoon" Pictures are from the Helms Service Manual. The Reason I used this Image is I didn't take any pictures of this step, Or the cartoon picture shows what to do better, They are used for Educational Purposes with no motive of making a profit of there intellectual propriety.
Tools Needed
- Needle Nose Pliers, Two Screw drivers will work as well
- 10,12,14 mm Sockets
- 3/8 Drive Ratchet, Extension(any Length)
- 2 Pry bars or equivalent.
- Many Jars/Buckets for Parts
- Helper(not needed, Highly Recommended)
- Long Flat bladed Screwdriver (Needed for Removing Bearings, Differential)
- Hammer (Needed for Removing Bearings, Differential)
- Gear Puller(Not needed, Recommended, I didn't use)
- Gasket Material I.E. Liquid Gasket(What I Use), Silicon, etc
Opening up the Case
1) Drain oil from Transmission
2) Take off all the bolts surrounding the outside of the case. put them in a bucket/jar
3) Then put the 3/8 extension in this "Sealing nut" shown below.

Then remove it using a ratchet, Put your "Sealing nut" in a jar.
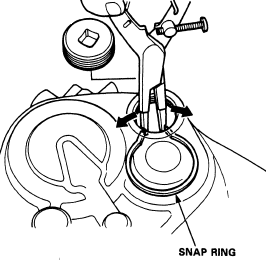
4) Now put your needle nose pliers in between the ring and spread it as shown below in the Picture(From Helms Service Manual). If you cant get this to work, Use two screwdrivers and pry ageist them.
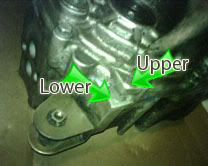
5) When holding snap ring open, Have your helper put pry bar in the following pry spots shown below and pry up thus lifting the upper Transmission half.


6) After the "Clunk" sound and it lifts you can let go of the Snap Ring
7) Lift upper Transmission "Half" and set aside.
Congratulations. You have not cracked open your First Transmission.
I Wanted to swap a gear and had a bad bearing so I removed my Gear Clusters. I will next describe how to do this.
Identifying What�s What.
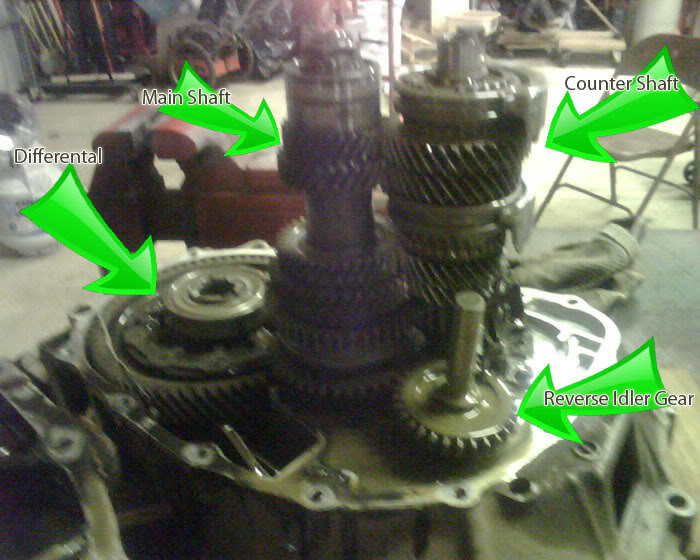

REMOVE YOUR GEAR CLUSTERS
I am sure there is other ways to do it. However this is how I remove the clusters.
1) Remove the bolt shown below, Its a Large Hex Head, on the bell housing side of the Transmission. if Looking at it from the pictures shown above, you have to flip the Transmission over or onto its side.
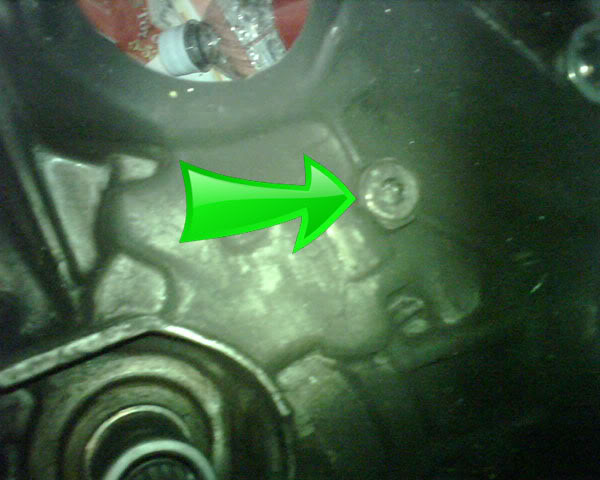
This will allow you to move all the Shift Arms Independently of the rest of the Shifting mechanism.
2) Set Transmission back down level, Bell housing down.
3) Remove Reverse Shift arm
4) Get up on table and stand on top of the sides of the Transmission. (There is alternative Means such as using pry bars, large screwdrivers, etc. They have not worked well for me. This method takes maybe. 5-10 seconds for me.
5) Grab Both the Main and Counter gear shafts.
6) Lift straight up. Both Gear clusters come out.
7) Set gear cluster on table and remove from shift arms.
Congratulations! Gear Clusters are out. Now you can swap gears or or replace bearings.
REINSTALL GEAR CLUSTER
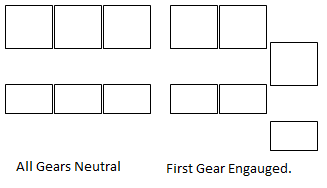
1) Put Main and Countershaft back together on the shift arms.
2) Place the Shifter arms so that 5,R and 3,4 are in Neutral then Have 1,2 set for 1 (so it would be at its lowest point) It should look like "First Gear Engaged in the Picture above.
3) Place the shifter knuckle into First Gear(i.e. Farthest Right position, pointing up.)
4) Push the clusters down into place and everything should line itself up.
5) If it went in correctly, your lowering shifting ball/mechanism is the gear shifter line. If not take off the cluster assembly and redo it until it is. Once Done Then Proceed to #6)
6) Reinstall Reverse Shift Arm
7) Reinstall large hex Headed bolt into this hole as shown below

REPLACE SYNCHRO/CHANGE GEARS
NOTE: The Following is The Main Shaft and Counter Shaft assembly. You need to use a Gear Puller to remove the top bearing on the Counter Shaft, Or Use Screwdrivers + Hammers like I did.


Its Simple as removing the gears/Synchros you want and replacing them. It would be a good idea to print both pictures and take with you to the shop.
If changing gear sets(I.E. Putting a Taller 5th in for mileage) you need to put the new gear on BOTH Main and Counter Shafts.
REMOVE DIFFERENTAL:
NOTE: If you want to Remove Your Differential, You will Have to take out both Gear Clusters
1) If Transmission is sitting like in the above images then you need to flip it upside down, So that the Bell housing side is up. However leaving it propped up on something such as 2x2 blocks of wood/Metal/Whatever.
2) Take Long Flat bladed Screwdriver and rest it on the backside of the Differential.
3) Hit the end with your hammer and then knock/punch out the differential. Its Press fit it and this will not harm it.
INSTALLING DIFFERENTAL:
NOTE: If you are installing a New Aftermarket Differential, Most likely an LSD compare sizes with the original before attempting to Install new Aftermarket LSD/Differential.
1) Place Differential back onto its whole. When its there take a Large socket that�s bigger then the axle shaft and hit the end with a Hammer to re press fit your Differential.
2) Make sure its Flush with the side of the transmission.
Your new differential is now installed! (Unless you put your old one back in)
ROARING/GROWLING NOISES?
Does Your Transmission make a roaring/growling noise? That�s a bearing dieing.
Its either one of the needle bearings (all of mine at 242000 original mile Transmission where fine, See above picture for there location.) or its your Main shaft Bearing.
TEST THE MAIN SHAFT BEARING
place your finger on the bearing and spin like the engine would, if it feels good(little resistance) then try rocking it back and forth. if its bad it will allow you to do this. Order a Replacement from Honda Item #"91002-Pso-003" Mine was 27.00USD at the local Honda dealer
INSTALL THE MAIN SHAFT BEARING
Okay So now that we have tested the "Main Shaft Bearing" and bought a new one we need to take out the old one. Its very similar to taking out your Differential
1) Flip your Transmission over from the side you tested it on. so its now on the Bell housing side.
2) Take a long flat bladed screw driver and hammer and punch out the old bearing.
3) Keep old bearing in New Item's bag, hang on wall and use as a conversational piece. (Joking, However I did it >_>)
4) Flip Transmission over again so bell housing is down.
5) Put the bearing over the old hole, then either hit the sides with a hammer (what I did) or use a large socket and knock it in.
Congratulations. You most likely fixed your dieing Transmission noise.
RESEAL THE CASE
1) Make sure everything if finished inside. Otherwise doing this is not smart.
2) Install some sort of gasket material like liquid gasket or silicon around the edge of the Transmission
3) place the shell on the top of the Transmission, then lower it making sure everything seats well, the last little bit wont close yet.
4) You need to spread the Snap Ring again to go over the Counter shaft end with 2 screw drivers or needle nose pliers.
5) Have Helper Lower the case w/ Hammer rest of way down. It should not take much force to do this. Hit on the Pry areas only.
6) Transmission case should be seated, if Excess force is needed then something is wrong, remove case and look at what�s holding it up.
Everything in this DIY Article is Based on the 92-95 Honda D-Block 5 Speed Ex/Si Transmission. Others are Similar
NOTE: This DIY Article is just Working on the transmission. Not taking it out of your Car. There are DIY Articles in the DIY Thread for this. Also I am not responsible for any damages done to your Transmission following this article. Processed on your own discretion. "Cartoon" Pictures are from the Helms Service Manual. The Reason I used this Image is I didn't take any pictures of this step, Or the cartoon picture shows what to do better, They are used for Educational Purposes with no motive of making a profit of there intellectual propriety.
Tools Needed
- Needle Nose Pliers, Two Screw drivers will work as well
- 10,12,14 mm Sockets
- 3/8 Drive Ratchet, Extension(any Length)
- 2 Pry bars or equivalent.
- Many Jars/Buckets for Parts
- Helper(not needed, Highly Recommended)
- Long Flat bladed Screwdriver (Needed for Removing Bearings, Differential)
- Hammer (Needed for Removing Bearings, Differential)
- Gear Puller(Not needed, Recommended, I didn't use)
- Gasket Material I.E. Liquid Gasket(What I Use), Silicon, etc
Opening up the Case
1) Drain oil from Transmission
2) Take off all the bolts surrounding the outside of the case. put them in a bucket/jar
3) Then put the 3/8 extension in this "Sealing nut" shown below.

Then remove it using a ratchet, Put your "Sealing nut" in a jar.
4) Now put your needle nose pliers in between the ring and spread it as shown below in the Picture(From Helms Service Manual). If you cant get this to work, Use two screwdrivers and pry ageist them.

5) When holding snap ring open, Have your helper put pry bar in the following pry spots shown below and pry up thus lifting the upper Transmission half.


6) After the "Clunk" sound and it lifts you can let go of the Snap Ring
7) Lift upper Transmission "Half" and set aside.
Congratulations. You have not cracked open your First Transmission.
I Wanted to swap a gear and had a bad bearing so I removed my Gear Clusters. I will next describe how to do this.
Identifying What�s What.


REMOVE YOUR GEAR CLUSTERS
I am sure there is other ways to do it. However this is how I remove the clusters.
1) Remove the bolt shown below, Its a Large Hex Head, on the bell housing side of the Transmission. if Looking at it from the pictures shown above, you have to flip the Transmission over or onto its side.

This will allow you to move all the Shift Arms Independently of the rest of the Shifting mechanism.
2) Set Transmission back down level, Bell housing down.
3) Remove Reverse Shift arm
4) Get up on table and stand on top of the sides of the Transmission. (There is alternative Means such as using pry bars, large screwdrivers, etc. They have not worked well for me. This method takes maybe. 5-10 seconds for me.
5) Grab Both the Main and Counter gear shafts.
6) Lift straight up. Both Gear clusters come out.
7) Set gear cluster on table and remove from shift arms.
Congratulations! Gear Clusters are out. Now you can swap gears or or replace bearings.
REINSTALL GEAR CLUSTER

1) Put Main and Countershaft back together on the shift arms.
2) Place the Shifter arms so that 5,R and 3,4 are in Neutral then Have 1,2 set for 1 (so it would be at its lowest point) It should look like "First Gear Engaged in the Picture above.
3) Place the shifter knuckle into First Gear(i.e. Farthest Right position, pointing up.)
4) Push the clusters down into place and everything should line itself up.
5) If it went in correctly, your lowering shifting ball/mechanism is the gear shifter line. If not take off the cluster assembly and redo it until it is. Once Done Then Proceed to #6)
6) Reinstall Reverse Shift Arm
7) Reinstall large hex Headed bolt into this hole as shown below

REPLACE SYNCHRO/CHANGE GEARS
NOTE: The Following is The Main Shaft and Counter Shaft assembly. You need to use a Gear Puller to remove the top bearing on the Counter Shaft, Or Use Screwdrivers + Hammers like I did.


Its Simple as removing the gears/Synchros you want and replacing them. It would be a good idea to print both pictures and take with you to the shop.
If changing gear sets(I.E. Putting a Taller 5th in for mileage) you need to put the new gear on BOTH Main and Counter Shafts.
REMOVE DIFFERENTAL:
NOTE: If you want to Remove Your Differential, You will Have to take out both Gear Clusters
1) If Transmission is sitting like in the above images then you need to flip it upside down, So that the Bell housing side is up. However leaving it propped up on something such as 2x2 blocks of wood/Metal/Whatever.
2) Take Long Flat bladed Screwdriver and rest it on the backside of the Differential.
3) Hit the end with your hammer and then knock/punch out the differential. Its Press fit it and this will not harm it.
INSTALLING DIFFERENTAL:
NOTE: If you are installing a New Aftermarket Differential, Most likely an LSD compare sizes with the original before attempting to Install new Aftermarket LSD/Differential.
1) Place Differential back onto its whole. When its there take a Large socket that�s bigger then the axle shaft and hit the end with a Hammer to re press fit your Differential.
2) Make sure its Flush with the side of the transmission.
Your new differential is now installed! (Unless you put your old one back in)
ROARING/GROWLING NOISES?
Does Your Transmission make a roaring/growling noise? That�s a bearing dieing.
Its either one of the needle bearings (all of mine at 242000 original mile Transmission where fine, See above picture for there location.) or its your Main shaft Bearing.
TEST THE MAIN SHAFT BEARING
place your finger on the bearing and spin like the engine would, if it feels good(little resistance) then try rocking it back and forth. if its bad it will allow you to do this. Order a Replacement from Honda Item #"91002-Pso-003" Mine was 27.00USD at the local Honda dealer
INSTALL THE MAIN SHAFT BEARING
Okay So now that we have tested the "Main Shaft Bearing" and bought a new one we need to take out the old one. Its very similar to taking out your Differential
1) Flip your Transmission over from the side you tested it on. so its now on the Bell housing side.
2) Take a long flat bladed screw driver and hammer and punch out the old bearing.
3) Keep old bearing in New Item's bag, hang on wall and use as a conversational piece. (Joking, However I did it >_>)
4) Flip Transmission over again so bell housing is down.
5) Put the bearing over the old hole, then either hit the sides with a hammer (what I did) or use a large socket and knock it in.
Congratulations. You most likely fixed your dieing Transmission noise.
RESEAL THE CASE
1) Make sure everything if finished inside. Otherwise doing this is not smart.
2) Install some sort of gasket material like liquid gasket or silicon around the edge of the Transmission
3) place the shell on the top of the Transmission, then lower it making sure everything seats well, the last little bit wont close yet.
4) You need to spread the Snap Ring again to go over the Counter shaft end with 2 screw drivers or needle nose pliers.
5) Have Helper Lower the case w/ Hammer rest of way down. It should not take much force to do this. Hit on the Pry areas only.
6) Transmission case should be seated, if Excess force is needed then something is wrong, remove case and look at what�s holding it up.
Last edited by chrono404 on Wed Mar 18, 2009 1:51 am, edited 4 times in total.


 ... wow.... just... wow...


 Awesome.


