- Fri Jul 15, 2011 2:32 pm
#263673
Just thought I could help folks out with my DIY I posted on a local Honda forum.
**** Warning: I shall not be held responsible if you mess up your car by performing this technique or method. Do so at your own risk ****
First of all, this is NOT a copy/pasted write-up made by someone else.... found on another website. All the work performed and pictures taken were by me. The sole intentional purpose of this method is to deter and possibly prevent thieves from stealing your car. This is an extra method of theft deterrent. IMO, there is no one method that can guarantee 100% protection so performing this can lessen the chances of you waking up and finding your car missing from your driveway or apartment complex parking lot.
The following are simple instructions on how to do this DM (deterrent method). Please read carefully!!! This method will work exclusively for Civics and Integras, the two most stolen Hondas.
1. Purchase the items you need/use:
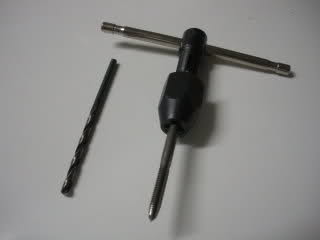
*** M4 - .7mm Carbon Metric Ground Thread Hand Tap (tapered)
*** 1/8� drill bits (get at least two just in case one breaks)
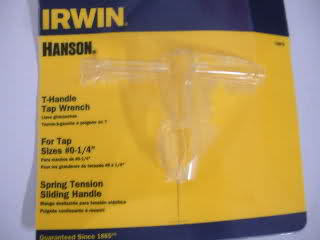
*** T-handle tap wrench (for sizes #0 – 1/4")
*** M4 - .7mm 12mm long tamper-proof screws (requires 2) --- DO NOT BUY ONES WITH PHILIPS, SLOTTED, OR HEXAGON (5/16�, 1/4�, etc.) heads.
*** key/chuck to turn the tamper-proof screws
*** cordless drill
*** Philips screwdriver
*** any color electrical tape


2. Remove the (3) screws that hold the lower/upper steering column cover found on the underside of the steering column. If your car is equipped with tilt steering, it may be helpful if you tilt the steering wheel leaving the lever down for clearance. Also, you need to literally lower the steering column by loosening the two 14mm nut that holds the bracket. Doing this will give you room when drilling and tapping.
***** remove the underdash paneling and unbolt the metal brace (2 ~10mm bolts) to prevent pinching any wire leading to the steering wheel *****
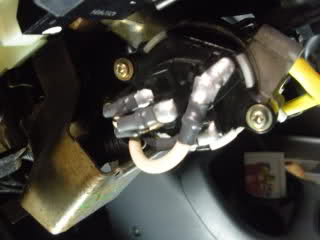
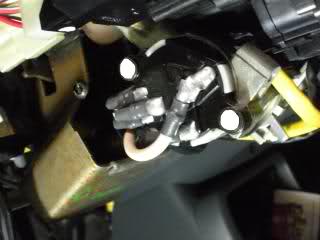
3. Once the steering column covers are removed, locate the ignition switch on the left side of the steering wheel. If you look, there are two Philips screws that hold the switch in place. Remove the two screws and the switch will literally fall out of the socket.
4. Since the drilling area may not be that deep, make sure to measure the length of the screw threads and use some electrical tape to mark how deep the drill bit needs to go. Start drilling until you reach the designated depth.
*** IN SOME CARS, it is safe to drill through ***
+++++ REMEMBER to use some type of lubrication on the tip of the tap (WD-40, silicone spray, oil, etc...) --- heat causes friction...meaning it may break the tap +++++
5. After you have drilled the two holes, prep the (M4 - .7mm) tap securely into the t-handle wrench. Spray some lubricant onto the tip of the thread bit. Start threading the freshly drilled holes, turning the wrench CLOCKWISE. When the wrench starts to feel tight, STOP and back off COUNTER-CLOCKWISE. Clean out any burrs from the hole afterwards.

6. Put the ignition switch back into the socket, and screw in the NEW tamper-proof screws to hold it in place.
7. Test to make sure everything is back to normal by turning on the car with the key. In the picture, the screw heads were removed for security purposes only.
8. Re-install the steering column covers, underdash paneling and brace....and YOU’RE GOOD TO GO. If you have any questions, feel free to PM me.
**** Warning: I shall not be held responsible if you mess up your car by performing this technique or method. Do so at your own risk ****
First of all, this is NOT a copy/pasted write-up made by someone else.... found on another website. All the work performed and pictures taken were by me. The sole intentional purpose of this method is to deter and possibly prevent thieves from stealing your car. This is an extra method of theft deterrent. IMO, there is no one method that can guarantee 100% protection so performing this can lessen the chances of you waking up and finding your car missing from your driveway or apartment complex parking lot.
The following are simple instructions on how to do this DM (deterrent method). Please read carefully!!! This method will work exclusively for Civics and Integras, the two most stolen Hondas.
1. Purchase the items you need/use:
*** M4 - .7mm Carbon Metric Ground Thread Hand Tap (tapered)
*** 1/8� drill bits (get at least two just in case one breaks)
*** T-handle tap wrench (for sizes #0 – 1/4")
*** M4 - .7mm 12mm long tamper-proof screws (requires 2) --- DO NOT BUY ONES WITH PHILIPS, SLOTTED, OR HEXAGON (5/16�, 1/4�, etc.) heads.
*** key/chuck to turn the tamper-proof screws
*** cordless drill
*** Philips screwdriver
*** any color electrical tape
2. Remove the (3) screws that hold the lower/upper steering column cover found on the underside of the steering column. If your car is equipped with tilt steering, it may be helpful if you tilt the steering wheel leaving the lever down for clearance. Also, you need to literally lower the steering column by loosening the two 14mm nut that holds the bracket. Doing this will give you room when drilling and tapping.
***** remove the underdash paneling and unbolt the metal brace (2 ~10mm bolts) to prevent pinching any wire leading to the steering wheel *****
3. Once the steering column covers are removed, locate the ignition switch on the left side of the steering wheel. If you look, there are two Philips screws that hold the switch in place. Remove the two screws and the switch will literally fall out of the socket.
4. Since the drilling area may not be that deep, make sure to measure the length of the screw threads and use some electrical tape to mark how deep the drill bit needs to go. Start drilling until you reach the designated depth.
*** IN SOME CARS, it is safe to drill through ***
+++++ REMEMBER to use some type of lubrication on the tip of the tap (WD-40, silicone spray, oil, etc...) --- heat causes friction...meaning it may break the tap +++++
5. After you have drilled the two holes, prep the (M4 - .7mm) tap securely into the t-handle wrench. Spray some lubricant onto the tip of the thread bit. Start threading the freshly drilled holes, turning the wrench CLOCKWISE. When the wrench starts to feel tight, STOP and back off COUNTER-CLOCKWISE. Clean out any burrs from the hole afterwards.
6. Put the ignition switch back into the socket, and screw in the NEW tamper-proof screws to hold it in place.
7. Test to make sure everything is back to normal by turning on the car with the key. In the picture, the screw heads were removed for security purposes only.
8. Re-install the steering column covers, underdash paneling and brace....and YOU’RE GOOD TO GO. If you have any questions, feel free to PM me.