B16, B18, B20
User avatar
By suspendedHatch
#89949 I did a valve adjustment on my 1992 Integra w/B18A and took pics. Does anyone want me to make it into a write-up? My account at g2ic no longer works. AFAIK the process is identical to any of the B series you'd find swapped into a Civic.

B18A Valve Lash Adjustment
Two posts down

B18C1 Valve Lash Adjustment
Further down
Last edited by suspendedHatch on Thu Aug 06, 2009 5:14 pm, edited 1 time in total.
User avatar
By Greasedmonkey
#89952 For sure! Anything like this is a help to everyone.
User avatar
By suspendedHatch
#90001 Okay Greasedmonkey, just for you.

I'm going to put this right at the top, cuz people seemed to miss the point with my D series DIY. The intention of this write-up is to show you how to do a valve adjustment as accurately as possible. My method is a little different and it guarantees that you'll get an accurate result even if you've never done this before (and you probably haven't, that's why you're reading this). If you can't spend $25 on Amazon and wait a week to get the proper tools; maybe you shouldn't attempt this.

A valve adjustment requires an accuracy of .001 inch! The head has to be torqued to the block. The engine has to be cold from sitting overnight. And you have to tighten the jam nuts with the special tool first, then finish them off with a torque wrench. All of these factors affect the valve clearance.

Special Tools

Image

The B18A requires a 12mm jam nut adjustment tool (look up the specs for your particular engine). The specs call for a feeler gauge tool that has the following: .003, .004, .006, .007. Neither of the tools I used in my D series write-up work for this engine. You can find the jam nut tool and "OEM 25025" on Amazon for super cheap.

I would have preferred the feeler gauges that have the bend in the end like I used in my D-series write-up, but I couldn't find them in the super small size that this engine requires.

The first thing you want to do with your feeler gauges is take the nut off and put the four gauges you'll be using right on top.

Other Tools

Image

Every tool I used I threw into a pile and took a pic after I was done. I used a wire brush on the spark plug threads, a hammer to tap the valve cover loose. Pliers for the hose clamp. 19mm for the crank pulley bolt. The panel popper tool was useful for getting the valve cover washers and breather hose off. I needed a drop light to see the timing mark and the cam sprocket marks. The drill with socket adapters is unnecessary but I get impatient turning the ratchet. The rest is self-explanatory, but I will list them out.

Ratchet
10, 12, 19mm, Spark Plug socket
Long and short Extensions
Mallet
Light
Flat head Screwdriver
Torque Wrench
One or two Torque Wrenches that can do 18 and 80 ft/lbs.

You'll also need liquid gasket (recommend Honda bond), spark plug boot grease, and anti-seize.

Incidentals

You might need a new valve cover gasket, spark plug tube seals, and valve cover grommets/washers.

Remove Wheel

Loosen the lugs on the driver's front wheel. Jack up the front of the car, put a jack stand under the driver's front jack point. Let the car down.

Plug Wires and Spark Plugs

Take the spark plug wires out of their holders and pull the spark plug boots out. Then remove the spark plugs. Check their condition, clean the threads, re-gap them, put a little bit of anti-seize on the threads for later.

Valve Cover

Image

Image

Remove all of the 10mm nuts holding the valve cover on. Also the nuts holding down the ground wire and the power steering hose. Put them in a box so you don't lose them.

TDC the Engine

Image

Put the 19mm on an extension and put it through this access hole onto the crank pulley bolt.

Image

Image

Start by finding top dead center for cylinder 1 (closest to crank pulley). Rotate the engine counterclockwise until the "up" arrows on the cam sprockets are facing up. Then shine a light down to the crank pulley from above until you see the pointer on the timing belt cover pointing at the white mark on the pulley. It doesn't have to be perfect.

Check Valve Clearance

Image

.003 gauge slides in...

Image

.004 doesn't.

Check the valve clearance for cylinder 1. The spec for the B18A is .003 inches on the intake, .006 on the exhaust. On my engine that has probably never had a valve adjustment, the all the intake valves were too loose and the exhaust valves were too tight. So this will make a huge difference!

Adjust the Valves

This is the method that was taught to me by a coworker who's been working on Hondas since long before I was born. It's extremely simple: you want the clearance as loose as it can be as long as the next larger feeler gauge will not fit. So on the intake valves the .003 gauge should slide in, but the .004 shouldn't. On the exhaust the .006 should slide in, but the .007 shouldn't. Piece of cake.

Image

Put the feeler gauge in the gap below the cam lobe, tighten the screw with the special tool, pull the feeler gauge out and then try the next larger gauge. If it wont slide in, hold the screw and tighten the jam nut. Then torque the jam nut to 18 ft/lbs and measure the clearance again. Torquing it will increase the clearance slightly, so keep this in mind when you're adjusting them so you don't have to keep repeating the process.

Rotate the Engine

Rotate the engine counterclockwise so that the "UP" marks are now facing the front bumper (cam sprockets turn 90 degrees). Adjust the valves on cylinder 3. Rotate the engine so the "UP" marks are down. Adjust the valves on cylinder 4. Rotate the engine so the "UP" marks face the windshield. Adjust the valves on cylinder 2.

You'll know if you're checking the wrong cylinder if the cam lobes are facing down.

Triple Check Your Measurements

Rotate the engine and check each cylinder one last time.

Put it Back Together

Image

Most of the re-installation process is the opposite of removal. The exception is that you need to clean the valve cover mating surface of any oil, crud, and old liquid gasket. Apply new liquid gasket to each of the 90 degrees bends in the valve cover gasket. You have about 15 minutes to torque the valve cover down before the liquid gasket dries. Then you have to wait an hour or two for it to fully cure before you can start the engine.

Reset the ECU

The 1992 Integra is OBD1 so you reset the ECU by pulling the 7.5A fuse in the fuse box under the hood (same as the EG Civic).

Hand tighten the lug nuts as much as you can with the wheel off the ground, drop the car, then torque them to 80 ft/lbs.
Last edited by suspendedHatch on Thu May 03, 2012 8:10 pm, edited 1 time in total.
User avatar
By ohDirka
#90051 Greaat write up I'll make it a sticky and make sure it makes it way in the DIY quick reference. :thumb:
User avatar
By suspendedHatch
#127743 B18C1 Valve Lash Adjustment

I bought a 1997 GSR with 152k miles and it looks like the maintenance has been neglected. When I checked the valve clearances they were all very loose beyond spec. Tightening them all to the low side of spec is a good way to get the most performance out of the engine. According to the maintenance schedule, valve lash should be checked every 15,000 miles ~ 24,000 km.

This method guarantees that you'll get it right even if it's your first time (window-lickers excluded). :bye: You know who you are. You ride the short bus and you're totally helpless. Please don't work on your car!

Adjust a Cold Engine
The engine has to be stone cold from sitting overnight. When you're talking about accuracy of .001 of an inch, heat deep down in a seemingly cold engine can easily throw your measurements off making your valve adjustment pointless.
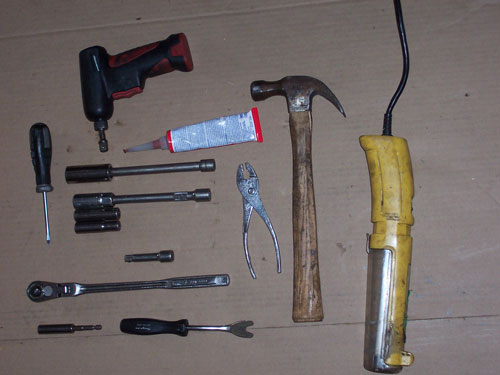

Tools and Supplies
Image
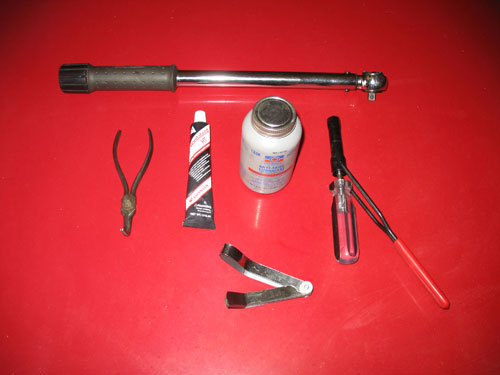
Valve Cover Gasket Kit
Honda Bond (pref'd)
Anti-seize (copper pref'd)
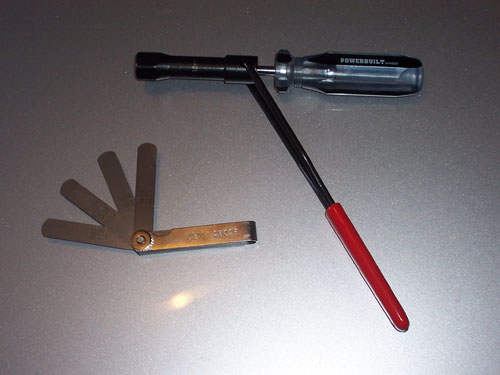
10mm Jam Nut Tool Alltrade/Powerbuilt 648827 $13 Amazon
Feeler Gauges .006, .007, .008 inch Craftsman Part No. 40802 $10 Sears
Ratchet
10, 12, 19mm Sockets
16mm Spark Plug Socket
Long Extension
Jack
Jack Stand
Wheel Chock
Torque Wrench capable of 7 to 80ft/lbs
Needle Nose Pliers (bent pref'd)

Torque Specs
Valve Cover Nuts 7ft/lbs
Lug Nuts 80ft/lbs
Spark Plugs 13ft/lbs
Jam Nuts
B18B
18 ft/lbs
B18C1
14 ft/lbs

Valve Clearance
B18C1
Intake .006 - .007 in
Exhaust .007 - .008 in
B18B
Intake .003 - .005 in
Exhaust .006 - .008 in

Image

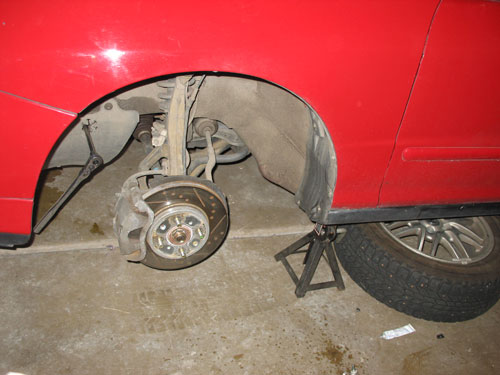
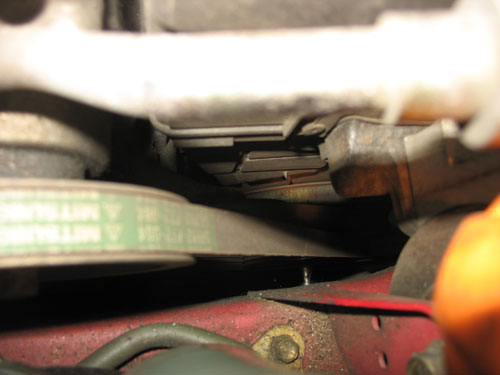
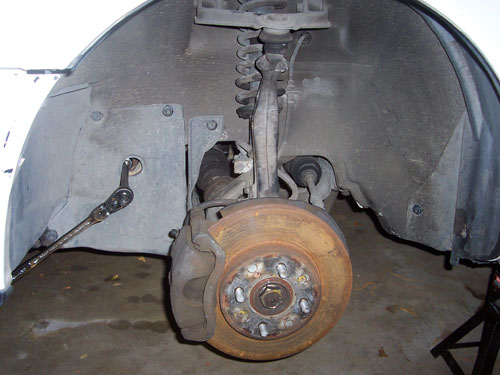
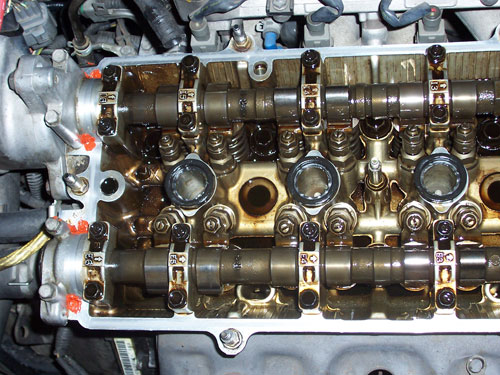
Set the parking brake. Chock a rear wheel. Loosen the lug nuts. Jack up the car and put the driver's side front on a jackstand at the jack point. Remove the wheel. You can access the crank pulley bolt with a 19mm socket and a long extension. This is how you will turn the engine by hand to tdc for each cylinder.
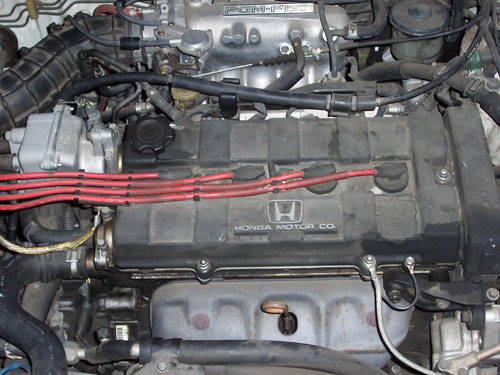
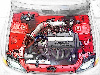
Please ignore my ricer brake rotors. The previous owner had them installed.

Image

Image

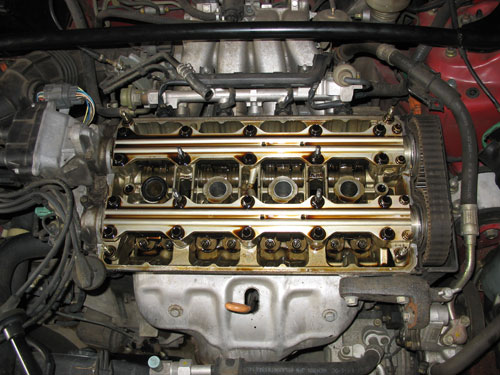
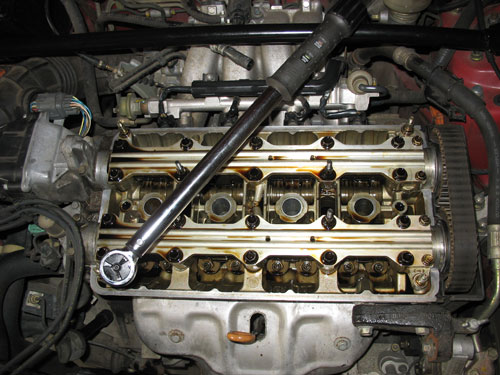
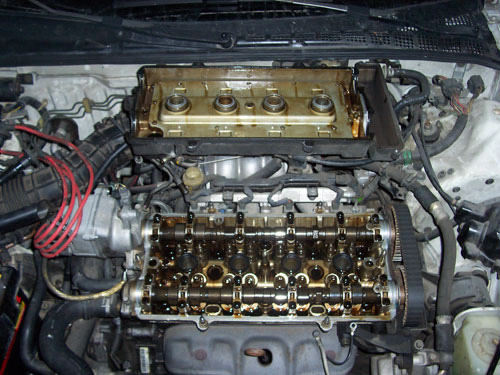
Remove the valve cover nuts, the ground wire, the breather hose, and the power steering bracket so that you can remove the valve cover. If the valve cover wont budge, tap it on the sides with a rubber mallet to break it free. Remove the spark plugs to make cranking the engine much easier.

Image

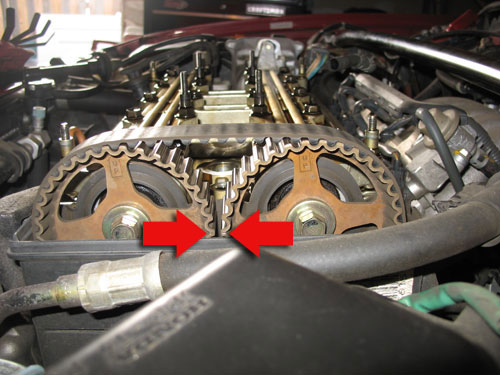
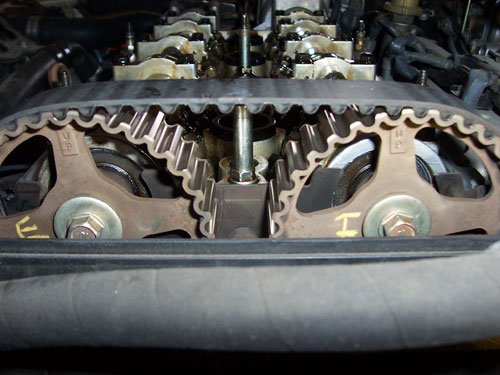
The cylinder closest to the cam sprockets is #1. The sprockets have markings on them to indicate when #1 is at tdc. The arrows will be pointing up and the markings on the sprockets will be aligned. For doing a valve adjustment, it doesn't have to be perfect. It just has to be close enough that the cam lobes aren't pushing on the valves.

Image

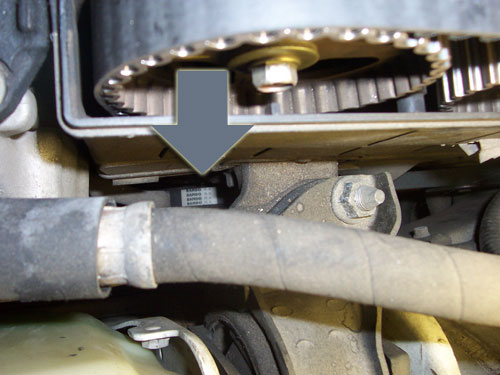
And just for confirmation the pointer on the timing belt cover will be pointing at the white mark on the crank pulley. Again, for a valve adjustment, it just has to be close.

Method
Now here is the method that guarantees that you get a good result even if you have no experience judging the amount of drag a feeler gauge should have.

When you check the valve clearance specs (found on the emissions label on the underside of your hood), it will have a high side and low side. You will get the most performance by setting all your valve clearances to the low side. You also want all your valves to have exactly the same clearance. If you have this performed by a mechanic, they might not touch a valve that is within that range. So you end up with an unbalanced engine.

For the B18C, the low side of the spec for the intake valves is .006 of an inch, and the exhaust is .007. The method is to try the next larger gauge to make sure it doesn't fit. So try .007 on the intake and .008 on the exhaust.

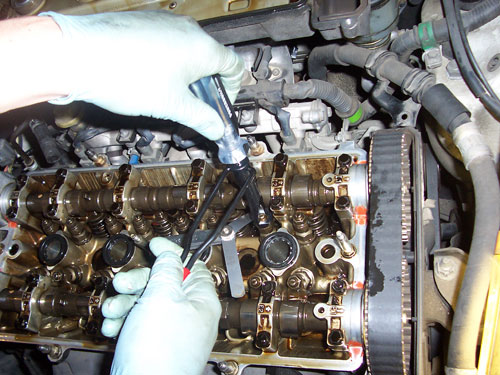
First loosen the valve jam nut, slide the feeler gauge in (low side of the spec), tighten the valve clearance until you can't pull the gauge out, loosen it just a hair so the gauge slides out with some drag. Put the feeler gauge in place again and tighten the jam nut. Slide the feeler gauge out again and try the next larger gauge +.001. It should not fit. For example on the intake valves the .006 should slide in with some drag but the .007 should not be able to slide in.

Torque Changes the Clearance
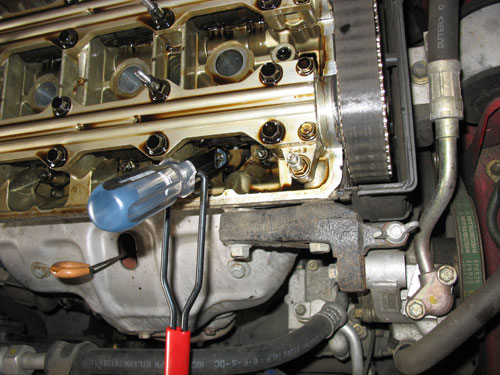
When you torque the jam nut, it may change the valve clearance. So it's important to get the torque just about right using the special tool, then check the torque with a torque wrench. Then recheck the valve clearance before you move on to the next valve.

Image
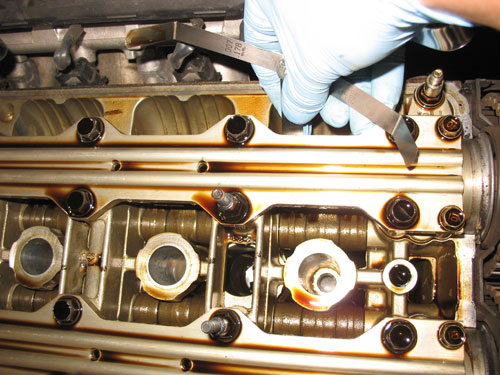
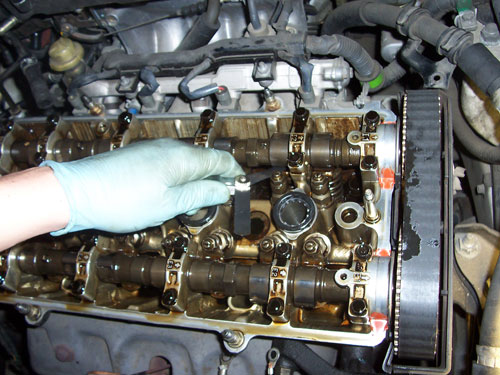
Checking one of the intake valve's clearance.

Image
Checking one of the exhaust valve's clearance.

Image
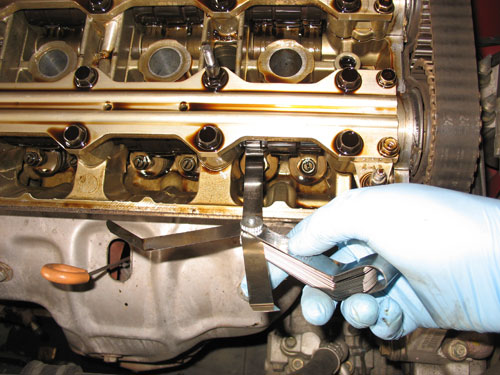
Adjusting the clearance and tightening the jam nut.

Image
Torque the jam nut and recheck the clearance.

Image
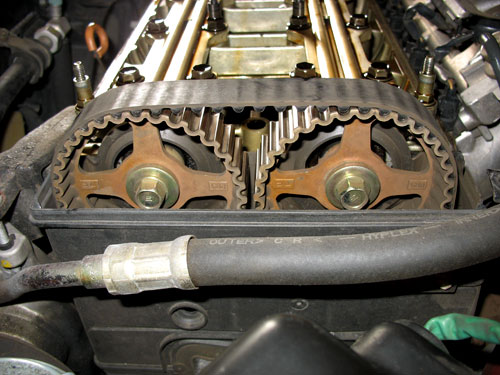
Now crank the engine so that the cam sprockets rotate 1/4th and the UP indicators are pointing to the front bumper. It's important to know that the cylinders don't fire 1, 2, 3, 4; they fire 1, 3, 4, 2. So after cranking the motor you now have cylinder 3 on tdc. So check cylinder 3 valve's clearances, not #2.

After adjusting #3, rotate the cam sprockets counterclockwise another 1/4th so the UP indicators are facing down. Now adjust cylinder 4's valve clearances.

After adjusting #4, rotate the cam sprockets counterclockwise another 1/4th so the UP indicators are facing right. Now adjust cylinder 2's valve clearances.

It's a good idea to recheck 1-4 again and get all the valve clearances as consistent as possible.

Image
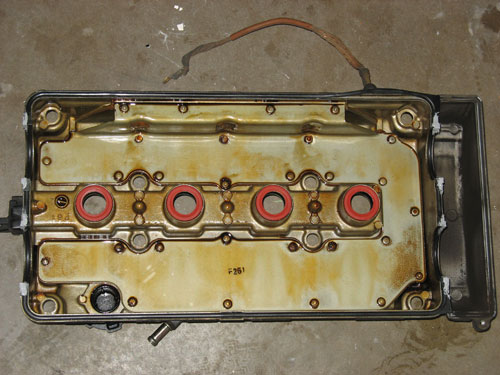
If you're replacing the valve cover gasket and spark plug tube seals, now is a good time to do that. Wipe of any oil and remove all of the old liquid gasket material. Apply the Hondabond to the valve cover gasket at the 90 degree angles. Work quickly because you only have a few minutes before it dries and you want the valve cover torqued down before that happens.

Image
Torque the valve cover nuts to spec. They don't require very much torque and it surprises a lot of people when they snap them off.

Reset the ECU
It's important to reset the ECU afterward because the airflow through the engine will drastically change with a valve adjustment. On most Hondas / Acuras you simply remove the 7.5A ECU backup fuse found in the under-hood fuse box for about 15 seconds.

Wait for the Hondabond to Cure
Don't immediately jump in the car and drive away. You need to give it a couple hours for the liquid gasket to fully cure before you apply oil pressure to them. Otherwise you could have a leaky gasket and terminally filthy engine.
Last edited by suspendedHatch on Thu May 03, 2012 8:13 pm, edited 2 times in total.
User avatar
By Ej2-B16a
#144615 in reality you dont have to use "grey silicone aka hondabond" and if you do, you really dont have to wait for it to harden. (other wise we wouldnt adjust valves and just send the customers on their way without problems.

in our opinion silicone has most of the time been nothing but problems. just replace the valve cover gasket if it has more then 40k miles and youl be fine. just add a SLIGHT small dab on the corners

but if you wish to do this, its a great.. but very much not needed..


good write up tho buddy :thumb:


also just to add to that, its a 15 amp fuse in the under hood for OBD1.
User avatar
By suspendedHatch
#145124 All Honda engines are prone to leaking from the valve cover gasket around the distributor and cam humps. Besides the distributor O ring and cam seals themselves which also tend to fail on higher mileage motors.
User avatar
By Ej2-B16a
#145175
suspendedHatch wrote:All Honda engines are prone to leaking from the valve cover gasket around the distributor and cam humps. Besides the distributor O ring and cam seals themselves which also tend to fail on higher mileage motors.


thats more of a opinion, i do side jobs at a honda/acura service center (in return i help out around the shop) which means we take off many valve covers a day. never any problems when we dont silicone if do correctly with a GOOD gasket.

ofcourse dont expect any oil pukes if you are going to re use a shitty gasket.

I like having a clean motor, everytime my head and block is out of the car i always hot tank it multiple times til it looks like new, believe me if i had any oil spills on my motor i would flip, but im oil free :D

anyways im not saying its a crime at all to put silicone, it can be a good thing but its not a must.
By 10secdream
#145181 Very good writeup. I must say it is a lot easier to adjust the valves than on a JZ engine.
By Moez_cx
#283289 Sorry for reviving this thread 8) But do u really have to raise the. Car up to access the bolt ? I can clearly access it from within the endings bay no prob . Or will I mess up the timing :? I really don't get it if I leave in neutral and just turn it I should be fine and Also can I check wether not if I'm at tdc by removing the distributor cap and checking the brush? I'm not trying to take the easy way out I'm just not around that much available tools thanks
User avatar
By 1ACarlos
#283409 Thanks for the info. Very helpful
User avatar
By -paul
#301872 Shame the pictures aren't working anymore. :(
User avatar
By suspendedHatch
#302569 Those went down with my website but we're working to get it back up again.